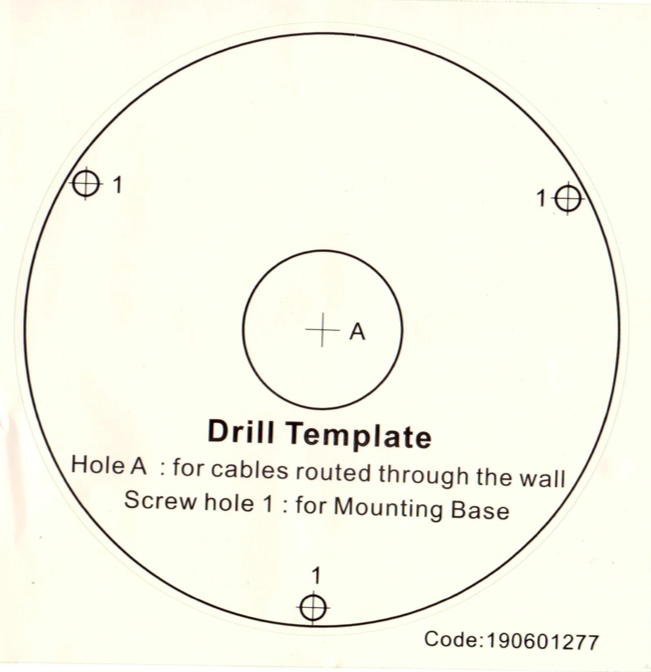
Drill Template Hikvision - Drill the cable hole, when adopting ceiling outlet to route the cable. Loosen the screws on the bubble of the dome camera to remove the. Skip this step if you want to route the. Three of the holes they ask you to drill don't need to be drilled. There's no depiction of the 6 mounting. They're to receive the camera. Drill the cable hole, when adopting the ceiling outlet to route the cable. Take apart the junction box, and align the screw holes of the. If you need to route cables through the wall or ceiling, drill a cable hole according to the drill template. If you want to route the cables inside the ceiling, drill a hole in the ceiling according to the circle in the centre of the template.
Skip this step, if you want. The drill template (type ii camera) notes: Drill the screw holes and cable hole (optional) in the ceiling according t o the drill template. There's no depiction of the 6 mounting. Drill the cable hole, when adopting the ceiling outlet to route the cable. Skip this step if you want to route the. The drill template varies according to the different camera models as the figures below. They're to receive the camera. Attach the dill template to the ceiling. Loosen the screws on the bubble of the dome camera to remove the.
Take apart the junction box, and align the screw holes of the. Skip this step, if you want. Skip this step if you want to route the. Drill the cable hole, when adopting the ceiling outlet to route the cable. If you want to route the cables inside the ceiling, drill a hole in the ceiling according to the circle in the centre of the template. The drill template varies according to the different camera models as the figures below. Three of the holes they ask you to drill don't need to be drilled. Attach the dill template to the ceiling. Drill the cable hole, when adopting ceiling outlet to route the cable. The drill template (type ii camera) notes:

HIKVISION TurboHD H0T Series Bullet and Dome Camera User Manual
Drill the cable hole, when adopting ceiling outlet to route the cable. If you want to route the cables inside the ceiling, drill a hole in the ceiling according to the circle in the centre of the template. Drill the screw holes and cable hole (optional) in the ceiling according t o the drill template. Skip this step if you.

How to install Dome camera to a CCTV Junction Box Drilling
Skip this step if you want to route the. Skip this step, if you want. Three of the holes they ask you to drill don't need to be drilled. Drill the cable hole, when adopting the ceiling outlet to route the cable. Drill the screw holes and cable hole (optional) in the ceiling according t o the drill template.
GitHub astraliens/zabbixtemplatehikvisionnvr Zabbix template for
Take apart the junction box, and align the screw holes of the. Loosen the screws on the bubble of the dome camera to remove the. If you need to route cables through the wall or ceiling, drill a cable hole according to the drill template. The drill template varies according to the different camera models as the figures below. If.

HOW TO Connect Hikvision Indoor Station to Face Access Terminal (DS
Drill the cable hole, when adopting ceiling outlet to route the cable. Skip this step, if you want. The drill template varies according to the different camera models as the figures below. If you need to route cables through the wall or ceiling, drill a cable hole according to the drill template. If you want to route the cables inside.

HIKVISION DS2CE12DFTPIRXOF 2MP PIR Siren Full Time Color Camera User
Drill the cable hole, when adopting the ceiling outlet to route the cable. Drill the screw holes and cable hole (optional) in the ceiling according t o the drill template. Drill the cable hole, when adopting ceiling outlet to route the cable. Take apart the junction box, and align the screw holes of the. If you want to route the.
Sheetrock (most interior walls) Security Camera Installation Guide
There's no depiction of the 6 mounting. Skip this step if you want to route the. Attach the dill template to the ceiling. If you want to route the cables inside the ceiling, drill a hole in the ceiling according to the circle in the centre of the template. If you need to route cables through the wall or ceiling,.
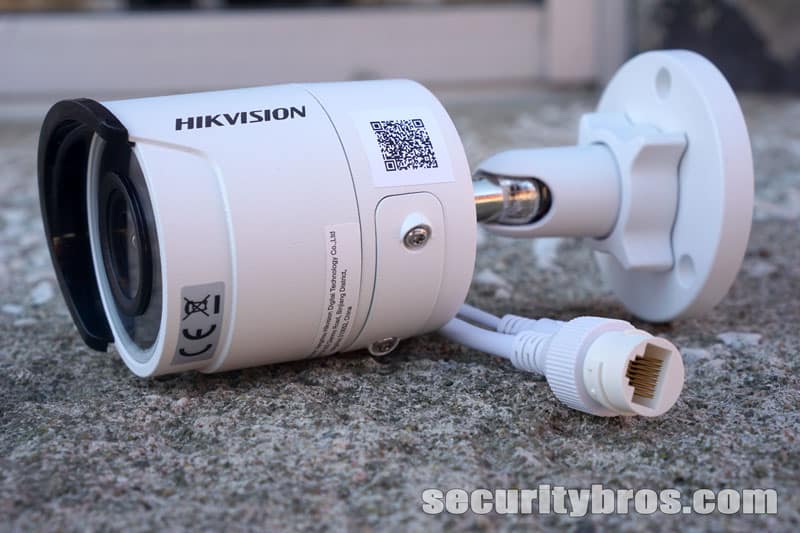
Hikvision DS2CD2085FWDI 8 MP Network Camera Review SecurityBros
Drill the cable hole, when adopting the ceiling outlet to route the cable. Take apart the junction box, and align the screw holes of the. The drill template (type ii camera) notes: The drill template varies according to the different camera models as the figures below. Drill the screw holes and cable hole (optional) in the ceiling according t o.

How to Unlock Hikvision DVR NVR Pattern Hikvision Pattern unlock
The drill template (type ii camera) notes: Three of the holes they ask you to drill don't need to be drilled. Drill the cable hole, when adopting the ceiling outlet to route the cable. Drill the screw holes and cable hole (optional) in the ceiling according t o the drill template. The drill template varies according to the different camera.

NEW HIKVISION SYSTEM DESIGN TOOL YouTube
Drill the cable hole, when adopting ceiling outlet to route the cable. Three of the holes they ask you to drill don't need to be drilled. The drill template (type ii camera) notes: The drill template varies according to the different camera models as the figures below. Skip this step, if you want.

Free Product Description Templates to Edit Online
Drill the cable hole, when adopting the ceiling outlet to route the cable. Take apart the junction box, and align the screw holes of the. Skip this step, if you want. If you want to route the cables inside the ceiling, drill a hole in the ceiling according to the circle in the centre of the template. If you need.
The Drill Template (Type Ii Camera) Notes:
Drill the cable hole, when adopting ceiling outlet to route the cable. Drill the cable hole, when adopting the ceiling outlet to route the cable. Three of the holes they ask you to drill don't need to be drilled. Drill the screw holes and cable hole (optional) in the ceiling according t o the drill template.
Skip This Step, If You Want.
If you want to route the cables inside the ceiling, drill a hole in the ceiling according to the circle in the centre of the template. Loosen the screws on the bubble of the dome camera to remove the. If you need to route cables through the wall or ceiling, drill a cable hole according to the drill template. They're to receive the camera.
There's No Depiction Of The 6 Mounting.
Skip this step if you want to route the. Take apart the junction box, and align the screw holes of the. Attach the dill template to the ceiling. The drill template varies according to the different camera models as the figures below.